Saturday, February 23, 2013

Miss Mickey's Peanut Butter Balls

copycat recipe from Trisha Yearwood's cooking show

1 cup white sugar
1/2 cup light corn syrup
1/2 cup dark corn syrup
2 cups crunchy peanut butter
4 cups rice cereal (I used chocolate rice cereal)
2-4 tbsps. soft butter

In a large pan, combine both corn syrups over medium heat.

Add the sugar to the corn syrup and stir until completely dissolved.

Immediately remove from heat.

Add the peanut butter and mix completely until well blended.


Add the rice cereal.  Use a strong wooden spoon or spatula to blend thoroughly.

It gets thick and tough to mix but it needs to be well blended.  Rub butter on the palm of yours hands a grab two tablespoons worth of the mixture into and roll into a ball.  Repeat with the rest of the batch being careful as some of it may be still hot.

Place on cookie sheet covered with wax paper.

You may devour immediately

These were for my hubby, the peanut butter lover in the family

I saw Trisha Yearwood and her husband Garth Brooks make these on her cooking show this morning and knew I had to make these for my hubby.  I'm not a fan of peanut butter, I sometimes can't stand the smell of it but every once in a blue moon, I crave it.  Today was a blue moon day.  I had one, just one and that was plenty.  Hubby loved them.

May you be enjoying your weekend and savoring every moment.


Sunday, February 10, 2013

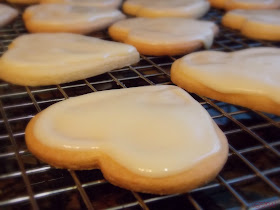
White Chocolate Cookies for VDay


Vanilla – Almond Sugar Cookies
3 cups unbleached, all-purpose flour
2 tsps. baking powder
1 cup sugar
2 sticks (salted) butter, cold
1 egg
¾ tsp. pure vanilla extract
½ tsp. pure almond extract

Combine the flour and baking powder, set aside.

Cream the sugar and butter.  Add the egg and extracts and mix.  Gradually add the flour mixture and beat just until combined, scraping down the sides of the bowl, especially the bottom.

The dough will be crumbly, so knead it together with your hands as you scoop it out of the bowl.  Wrap in plastic and refrigerate for two hours or overnight.

Preheat oven to 350F.

I had this dough leftover from last weekend when I made my football helmets for our Super Bowl shindig. It saved me time so there's your tip of the day, make the dough ahead of time.  Anyway, roll the dough out to 1/4 inch thick, maybe a tad bit thicker (that's the way I like them).  Use your favorite cookie cutter.

Place dough on an ungreased cookie sheet.  Bake for 12 - 14 minutes or until edges are browned.

When cookies are done baking, cool completely.  I stacked them only when they were cooled to get them together in one spot as I prepared the icing.

For the Icing:
4 tbsps. light corn syrup
4 tbsps. water +  a little more
2 cups or 1 bag white Gharadelli chocolate chips
1/4 cup milk
Red or Pink food coloring

Over low heat, using a small pot heat the corn syrup thorough then carefully add the water stirring constantly.

Heat until it starts to boil.  Remove from heat.

Immediately add the white chocolate chips, stir and add the milk a little at a time until you get the right consistency.  

It should look and feel like molasses.  I added a little bit of more water as it was still too thick until I was able to stir it and spread it on the cookie.

With an offset spatula spread the icing over the cookie.

Place on a cooling rack, not to cool it but to dry.  Repeat with the rest of the cookies.  Let set for a couple of hours before the next step but make sure to cover the leftover icing.

With the leftover icing, I added the red food coloring to make it pink.  Add a little more water if needed just in case the icing is too thick.  With a toothpick, I picked up the pink icing and just added some squiggly lines along the edges as well as any other designs I could think of.


Peanut Butter??
This was my hubby's idea.  So for the love of my hubby and since it is Valentine's Day, I added some creamy peanut butter . . . .

Yup, I sandwiched some peanut butter between my beautiful cookies.  Kept reminding myself, "for the love of my hubby", the peanut butter lover.

I made enough for the whole family.  Placed some in a fancy chocolate color cupcake wrap and tied a red ribbon around it.  

And this is the reason my life is complete, my grandbabies

Have a Happy Valentine's Day!  Savor every moment!
Sharing with:
StoneGable 
 
Chic on a Shoestring Decorating

Thursday, February 7, 2013

Repost - Valentine Cookies

I'm a fan at decorating cookies.  I spend a lot of time on them.  My hubby worries that I spend too much time on them.  I assure him that I'm loving it and having a lot of fun making them.  This is a repost from two years ago.  My favorite Valentine cookies that I decorated.

Sugar Cookies for Valentine's Day
(Sugar Cookie recipe)

I baked these cookies a few days ago.  It's good to start a couple of days ahead so that they have time to "age"....dry good and hard.

Royal Icing recipe:

1 cup confectioners sugar
2 tsps. milk
2 tsps. light corn syrup
1/4 tsp. almond extract   
Mix all the ingredients until smooth.
 
This icing is more like a glaze.  It's very difficult to spread, that's why the cookie is dipped into it.  I use this icing more for painting a design on the cookie as oppose to using Sprinkles to decorate it.   I followed this recipe to the "t" and found the icing to be WAY too tough to stir.  I added a little more milk, a wee little more corn syrup one teaspoon at a time until it was pliable.  If anything, add more milk than corn syrup other wise it won't harden as fast and you'll be waiting days for the icing to dry enough to decorate, I'm speaking from experience ;)
  
I then put my icing in a 9" pie plate just so that it would be easier to dip the cookie in and out.  Place cookie face down.

Very carefully pull the cookie off, one side first and then the other.  Let the excess drip off.  As soon as you turn it right side up, grab an offset spatula, spread the icing but don't spend too much time on it as the icing should smooth itself out.

Set the cookies on a drying rack to dry over night.  Since it's winter, it's very cold, so I was able to take my cookies drying on the rack out to my garage and leave them there to dry and harden in time for me to decorate them the following day.  Cool dry air is the best.

Colored gel for icing.  Green, black and red.  I don't know the names of each brush, I just used a small flat tip brush for thick lines, a small long haired tip brush for thin lines and a short narrow tip brush for writing.  I also have a container of water for each color to rinse the brush when needed.  Have plenty of paper towels to blot.

Shimmery pink pearl dust for the cookie edges.  I really like this stuff.  It's so silky and shimmery.  I feel like Tinkerbell with my pixie dust.  You can find all these food products at Michaels in the Wilton Cake section.

When the icing is good and dry, it's time to decorate.  Slightly wet the flat tip brush, dip it into a little bit of the pink pearl dust and paint the edges of each cookie heart

With the long narrow tip brush, dip it in a little bit of green gel and a little bit of water.  Paint squiggly lines in shape of the heart.  Also paint little green leaves..yeah, I know they look like hearts but that's okay.  It's a Valentine cookie, whatchu 'spect?

With the same long narrow tip brush, rinse it real good first and blot.  Dip in the red gel and water and paint little hearts to your heart's desire ;)  To get the lighter and darker effects, just water down the gel a bit.

I got the idea to paint these cookies this way from a French food blogger that I follow.  Her blog's name is La Table De Nana.  She's quickly becoming a favorite of mine like Pioneer Woman.

This is what I'll use to decorate these next cookies.

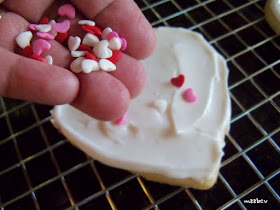
 Here's the recipe for this creamy frosting: Antonia's74 Royal IcingThis frosting is easier to spread.  Sprinkles work well with this frosting.

Sprinkles.  My grownup daughter loves Sprinkles to this day.

Sprinkle decorative red sugar for an added effect

Set on drying rack in a cool place.

There's plenty of love to go around.  


Love never fails
1 Corinthians 13:8  

The recipes for these cookies/icings are the same ones I used on my football helmet cookies I made for Super Bowl XLV.

Tuesday, February 5, 2013

Baltimore Crab Cakes

by Mario Batali

For the Crab Cakes:

1 1/2 lbs. Lump Crab Meat (picked over for shells)
2 limes, zested
4 scallions, green parts only, finely chopped
5 tbsps. parsley, finely chopped
3 oz. Canadian bacon, finely chopped
6 tbsps. Mayonnaise
1 large egg
5 tbsps. bread crumbs
2 tsps. seafood seasoning
1 1/2 tsps. salt
Freshly ground pepper
Olive oil
Lime wedges, for serving
Hot sauce, for serving

In a medium bowl, gently mix the crab meat

add the lime zest

add the scallions

add the parsley

add the Canadian bacon

add the Mayonnaise

add the egg

and then the bread crumbs.  Combine completely until evenly blended.

Season with the Old Bay Seasoning,

and then add the salt and pepper.  Gently handle so as to keep the mixture as loose as possible.

Gently shape the crab meat into 10 cakes (or smaller bite-size medallions like I did).  Handle the crab meat  as little as possible.

Place the crab cakes on a plate and cover with plastic wrap.

Refrigerate for at least one hour or up to four hours.  I refrigerated mine over night.

Place a non-stick saute pan on the grill (or on the stove top like I did) and add about 3 tbsps. of olive oil (or butter like I did).  Arrange the crab cakes in the pan in an even layer.  Work in batches if necessary so as not to overcrowd the pan.  Cook for about 3 minutes or until the crab is golden brown.  Gently flip the cakes over and cook 3 minutes more.  Serve with sauce (see recipe below).

For the Sauce:
6 tbsps. Mayonnaise
2 tsps. Old Bay Seasoning
3 tsps. freshly squeezed Lime juice
Several dashes of hot sauce

In a small bowl combine the mayonnaise

add the Old Bay Seasoning

and add the Lime juice and several dashes of hot sauce.

Mix together until well combined.  Cover and refrigerate until ready to serve.

I made these for our Super Bowl shindig.  We've had a tradition to cook foods representing the towns from both teams.  Obviously these represented Baltimore, MD.  I found it in the nick of time as I was running out of ideas on what how to make them.  Seems like a friend on Facebook suggested I used the one Mario Batali made on one of the morning shows.  I found the recipe on www.youchew.com and I'm so glad I did.  I put them together on Saturday and cooked them on Sunday.  Hubby loved them and I thought they were okay.  I think the sauce is what gave them the best taste and hubby thought so too.  I'm sure this sauce would taste good with any other fish dish or fish sandwich.  We savored every bite!