
Tuesday, April 12, 2011

Simple Breakfast Egg Burritos

Simple because yes, they're very easy to make
Simple because that's what they are - simple, nothing fancy but yet so tasty


5 bacon strips, cooked and chopped into bits
5 sausage links, cooked and sliced into small bits
1 medium size yellow onion, chopped
5 eggs
1/4 cup heavy cream or whole milk
2 tbsps. butter
1 cup of shredded cheese
20 fajita size flour tortillas
Salt and pepper


In a large plate or medium size bowl, cut cooked bacon and sausage into small pieces and combine.  Set aside.


In the same pan where you fried your bacon and sausage (I used my 12" skillet), add a tbsp. of butter if needed, saute and brown the onion.


 Turn the heat down to medium low, add the bacon and sausage bits, stir and combine.

In a medium bowl, scramble the eggs along with the cream.  Salt and pepper.  Melt another tbsp. of butter to frying pan and meats then pour in the egg mixture.  I like to let mine set for about 15 seconds then gently move around to mix but if you like to scramble non-stop then go ahead - there's no wrong way here.

Once the eggs and meat are combined to your liking, turn the heat off.  Sprinkle on the cheese, cover to let the cheese melt and set aside.

Wrap the stack of flour tortillas in two paper towel sheets.  Heat in microwave between 20-30 seconds.  Do NOT overheat.

Remove tortillas from microwave oven and place a spoonful of the egg mixture onto each tortilla towards one side.

Fold over and keep rolling.  As you noticed, I did not fold up the ends first and THAT'S OKAY.  I'm folding them over the way my mom did.

Place burritos seam side down.  Serve with your favorite sauce, in my case guess which one's mine? ;)

Plain and simple egg burritos only because I really didn't have anything else to add.  You can add just about anything you like, such as green onions, mushrooms, red & green peppers, the possibilities are endless.

Furthermore, what's so wonderful about these that if you have any leftover, you can always freeze them..
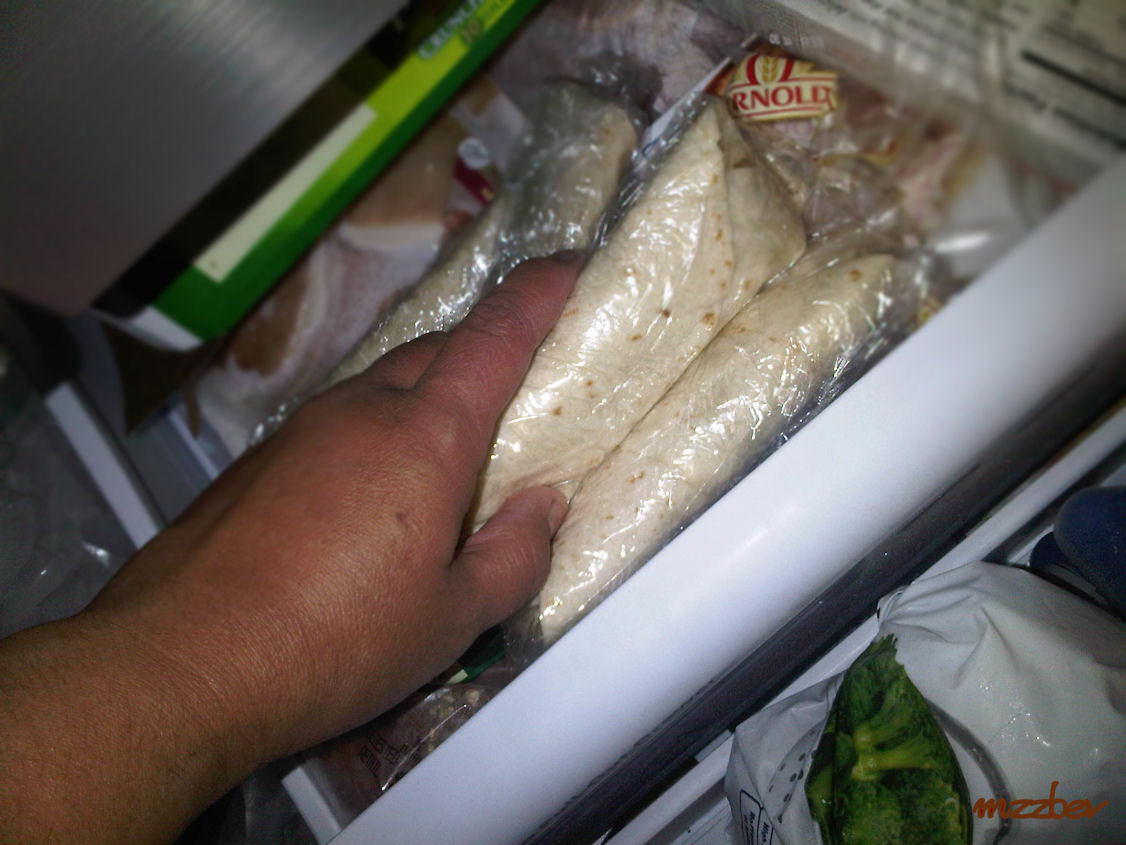
Simply wrap each one individually in plastic wrap and store in your freezer.  When you're ready to eat one, pop it in the microwave for 30-45 seconds more or less and enjoy!!  I like the idea of having leftovers because my hubby gets to enjoy them anytime he wants.

Wednesday, April 6, 2011

Bunny Cookies

Click here for Cookie Recipe


I baked these cookies for a special friend of mine who is having her "Art Show" soon and needed some refreshment donations.  I volunteered to make her some cookies and since it's Spring time, I decided to make these bunnies.


This is the cookie cutter I used.  I believe I bought it Walmart or Target.  These are the cookies after I baked them a couple of days ago.  They can't be stacked like this when they're fresh out of the oven, otherwise they'll crack.  Allow them to dry for at least 24-48 hours.  That's why it takes a couple of days to make these cookies - beginning to end.

I opted to use my offset spatula to ice the cookies as oppose to dipping them into the icing.  I wanted to try this method just to see if it worked better for me or not.  It's a little less messy than the other way and I like that I can control the amount of icing on the cookie to spread around fairly easy.

Once I iced the cookies, I laid them on a cooling rack to dry out.  It took at least 24 hours to dry.  The following night I would start painting them.

I used the same pink fairy dust that I used on my Valentine Cookies to paint the ears using a flat tip brush.  I got the idea to paint these bunnies like this from another favorite food blogger, "La Table De Nana", she's soooo artistic.

Used black food coloring to paint the eyelids and lashes with a short, narrow brush tip.

I used a long, narrow tip brush and green food coloring for the grass and then used the short, narrow tip brush and black food coloring to paints swirls for the bunny tail.

I spread them out on cookies sheets to dry.....again......overnight

These bunnies seem to be multiplying!!

Ralph

The triplets

and the whole motley crew, packed and ready to go.

Happy Spring!!!
~isavortheweekend


I shared this post with:

Sunday, April 3, 2011

Teriyaki Chicken Thighs

by Williams-Sonoma Essentials of Slow-Cooking  (click on photos for larger image)


8 chicken thighs
Salt and freshly ground pepper
1 clove garlic, minced
2 inch piece fresh ginger, peeled and finely chopped
1/2 cup soy sauce
1 tsp. Asian sesame oil
2 tbsps. unsalted butter
2 tbsps. canola oil
1/4 cup mirin
1 tbsp. sugar
Sliced green onions for garnish


Season the chicken thighs generously with salt and pepper.  

In a nonreactive bowl, stir together the garlic, ginger, soy sauce and sesame oil.  Add the chicken thighs

 and turn to coat.

Marinating chicken ready to go into the refrigerator

Cover and marinate in the refrigerator, turning frequently, for at least 1 hour or up to overnight
  
Remove the chicken from the marinade and pat dry with paper towels.  Discard the marinade.

In a large frying pan or Dutch oven over medium-high heat, melt the butter with the canola oil.  Working in batches if necessary, add the chicken and cook, turning frequently, until browned, about 5 minutes.

Transfer all the chicken to the Dutch oven.  Add mirin and sugar and turn the thighs a few times to coat.  Cover and cook over low heat until the chicken is opaque throughout, about 30 minutes.  Uncover and cook, turning often, until the thighs are glazed about 10 minutes longer.

Transfer the chicken to a warmed platter, garnish with green onions and serve at once.

I'm a BIG, BIG fan of Asian food.  This was a fairly simple recipe, took more time than I anticipated but I know once I make it several times, it will be quicker and even easier.

I served this with fried rice which made this whole dish complete.  I also used Tamaru soy sauce instead of just regular soy sauce which I believe made a big difference.  Tamari soy sauce is like the Rolls Royce of soy sauces, much richer flavor in my humble opinion.  Because I love Asian food so much, this meal was deeeelicious.  Not my hubby's favorite but he still ate it.  Guess that will happen every now and then so it's good to know, that way I can make it when he's out of town.  I also believe it would be a great dish for company.  ~isavortheweekend


For dessert, this is what I made and I justed posted it:  Chocolate Pudding Cake.

Chocolate Pudding Cake

by Andrew Schloss - Art of Slow Cooking  (click on photo for larger image)

Nonstick oil spray
1 Cup flour
2 tsps. baking powder
1/4 tsp. salt
1 cup granulated sugar, divided
1/2 cup unsweetened cocoa powder, divided
1/2 cup milk
1 tsp. vanilla extract
1/4 cup vegetable oil
1/2 cup dark brown sugar
1 cup boiling water or coffee


Spray a 1 1/2 qt. souffle' dish with oil and set aside.


Combine the flour, baking powder, salt, 3/4 cup of the granulated sugar, and 1/4 cup of the cocoa in a mixing bowl.  Add the milk, vanilla, and oil and mix into a stiff batter.  Scrape into the prepared dish and smooth the top.


Mix the brown sugar, the remaining 1/4 cup granulated sugar, and remaining 1/4 cup cocoa in a small bowl, sprinkle in an even layer over the top of the batter.  Pour the boiling water or coffee over all.


To continue with slow cooker method:  Set the dish inside a 6 qt. slow cooker and cover the top of the slow cooker with a folded kitchen towel, and then with the cooker lid.  Cook on high for 2 1/2 hours, or until the top of the cake is set and the bottom is still syrupy.  Cut into wedges  or spoon onto plates, using the syrup on the bottom as sauce.


To continue with oven method:  Place dish into 350 degree pre-heated oven.  Bake for 25 minutes.  Let set for a few 2-3 minutes.  Cut into wedges or spoon onto plates, using the syrup on the bottom as sauce.


I bought a new camera because my old one broke.  I could use my Blackberry camera which I often do (but I'm afraid I'm going to ruin it by getting food particles in it) but this new one I just bought is being sent back :(  It says it's a 10mgp but it's  all lies!!  Every picture I took as I cooked this recipe came out fuzzy, blurry and horrible color.  I'm very disappointed only because I'm not able to show you all the pictures that I took of this ooooey-goooey, chocolately deliciousness.  I had to resort to my Blackberry to take the top picture.  So anyway, this recipe is really simple, the hubby, grandma and I enjoyed it immensely and unfortunate for my waistline but fortunate for our palate it's so easy to make, it's going to be a favorite for days, weeks, months and years to come :)  ~isavortheweekend

Wednesday, March 23, 2011

Not Your Everyday Kitchen Apron


I know, I know this has nothing to do with food, or savoring the weekend, etc., but I just couldn't help but tell the whole world about my new love and new find.  I stopped by Bed, Bath and Beyond the other day as I just love going in there to see what new gadget or gizmo I can get my hands on to sneak back into the house without my hubby finding out since he says we don't have any room for anything else....... So, anyways, I found these in the store and practically screeched out loud! they're SOOOO adorable!  I'm so excited about these.    I wanted them ALL and imagined myself in all of them and finally came to my senses realizing that if any, I could only have one.  The one I chose was not my first choice, I ended up getting the one that kinda matched my kitchen decor.  So. . . . , without further ado.......may I present.......the kitchen apron collection:


Audrey Ladybug Poppy Apron by Jessie Steele
Isn't she adorable?!! Just look at the cute red bow!  I will wear this one when I'm watching Audrey Hepburn in "Roman Holiday" along with my red lipstick.


.


Lolita Multi-Tini Apron
So feminine, so dainty....I love it!!  I will wear this one when I'm in the mood to dance around the kitchen with a goblet of Sparkling Cider.

.


Gigi Toile Hostess Apron by Jessie Steele
I'll wear this one when I cook a French dish - like Beef Bourgignion


.


Kiss the Cook Apron

This one I'll wear when I have alot, alot of people over the house for dinner.  If you can't figure out why, just ask me :)  lol, jk!!


.


Polka Dot Monogram Apron

This one I'll wear when I'm in the mood to feel retro like in a "I Love Lucy" mood.

.


Lolita Who Needs a Man Apron
This one I'll wear when I'm mad at my hubby ~ so I guess I'll never wear it!  lol, jk!

.


Queen of Everything Apron
This one I'll wear when I wanna feel like royalty - I need to find Elise's (my daughter's) tiara to wear with it.
.


Lolita I'm Kinda on a Diet Apron
Hmmmmm, I don't know if I'll ever wanna wear this one, but it is cute and colorful
.


Cookin' Claus Apron
This one I'll wear, duh! during Christmas!!! Isn't it adorable!!!?  I can't wait for Christmas!!!

.


Good Food Good Life Apron
This is the one I ended up buying even though I wanted all of them!  I bought this one mainly because it matches my kitchen decor - kinda Frenchy - coffee cafe-ish.  I will wear this one when I'm in the mood to cook some gooooooooood food.  Which will be everyday  :)

.


and now...... I saved the best one for last.....


.


The Little Black Dress Apron
Oh my goodness!!!  Look at the pearl necklace at the top!!!  Isn't she simply adorable and beautiful??  I adore this one the most!!!  I'll of course wear it when I'm feeling pretty and wanna dress up!!!  or maybe feel like Maria in West Side Story and wanna sing, "I Feel Pretty".  You have to see this one in person, SO CUTE!!!!

What a way to get all dressed up, even if you're not going anywhere.  So which one's your favorite?  Do tell.

You can also buy these online at:  Bed, Bath and Beyond.   They have many more and I want them all.  Do you think I might be able to sneak them into the house without my hubby finding out?? :)  ~isavortheweekend

Wednesday, March 16, 2011

Meyer Lemon Pound Cake

by Martha
FOR THE CAKE
  • 1 1/2 cups (3 sticks) unsalted butter, room temperature, plus more for pans
  • 4 cups sifted cake flour, plus more for pans
  • 1 teaspoon salt
  • 4 teaspoons baking powder
  • 2 3/4 cups sugar
  • 8 eggs, room temperature
  • 1 cup milk, room temperature
  • 2 teaspoons pure vanilla extract
  • Zest of 1 Meyer lemon
  • FOR THE GLAZE
  • Zest of 1 Meyer lemon
  • 2 3/4 cups confectioners' sugar, plus more if needed
  • 1/4 cup fresh Meyer lemon juice

DIRECTIONS

Preheat the oven to 325 degrees. Butter and flour two 9-by-5-by-3-inch loaf pans and set aside.

Sift the flour with the salt and baking powder two times and set aside.


With an electric mixer, cream the butter until fluffy. Add the sugar gradually, beating until light and fluffy.


Add the eggs, one at a time, beating well after each addition. Add the flour mixture to the butter mixture, alternating with the milk and vanilla. Stir only until thoroughly blended.


 Gently fold in the zest.


Pour batter into the prepared pans and level tops with an offset spatula. Bake for about 1 1/2 hours, until a cake tester comes out clean. 


Let the cake cool in the pan about 10 minutes; then remove to a wire rack to cool thoroughly.


Make the glaze: In a medium bowl, whisk all glaze ingredients to combine.


 If necessary, add additional confectioners' sugar to desired consistency.


Pour glaze on top of cakes.....

...... and serve


I watched Martha (Stewart) bake this the other night in her show, "Martha Bakes".  Well, I was smitten immediately.  I love sweet lemon in just about anything, anytime and I couldn't wait until the weekend to start baking these babies so decided to bake them the following day!  Meyer Lemons peaked my curiosity as well as I'd never heard of them.  Martha said to try to use them but if they couldn't be found, regular lemons would work.  I had to google to find out what a Meyer Lemon was and it's a good thing I did because otherwise, I would not have recognized them at the grocery store.  Here is the definition for a Meyer Lemon according to Wikipedia:  

The Meyer lemon (Citrus × meyeri) is a citrus fruit native to China thought to be a cross between a true lemon and either a mandarin or common orange. It was introduced to the United States in 1908 as S.P.I. #23028[1] by the agricultural explorer Frank Nicholas Meyer, an employee of the United States Department of Agriculture who collected a sample of the plant on a trip to China.[2]

So the following day, I made sure to stop by the store to buy my Meyer Lemons as well as some other items.  I almost overlooked the Meyer Lemons only because I first thought that they were tangerines, color shape and all.  I was still skeptical at the checkout counter as well as when I got home. So, I got home, grilled some burgers (a quickie dinner) and soon after excitedly started on my pound cakes.  As soon as I cut that Meyer lemon open, WOW!!!  The strong, lemony smell permeated my kitchen and I was then convinced that these were definitely lemons and not tangerines.  It took me a couple hours from start to finish and I'm content to say that, I have not one but two freshly baked Meyer Lemon Pound Cakes in my refrigerator waiting for me at home, at least I think I do, unless someone else got into them!  ~isavortheweekend
Related Posts Plugin for WordPress, Blogger...