.jpg)
1 pkg. Wilton cupcake wraps - white picket fence style
1 tub of dark chocolate frosting (must be dark in order to blend in with the "dirt")
1 large bag of shredded coconut
1/2 block, of fondant divided in half
3 tbsps. corn syrup
Orange gel food coloring (I had to mix yellow and red)
1/2 tsp. of pink shimmer powder food paint
Almond extract
Green gel food coloring
Blue food coloring
One pkg. Oreo cookies with the middle removed, and crushed down to look like potting soil
1 bunch of curly Parsley

I bought these wraps in February just because they were so cute, not knowing then what exactly I was going to do with them.
.jpg)
Using 1/2 tsp of the orange food coloring add it to half a fondant block, Keep rolling until most of it is distributed throughout the fondant and finally to a 1/8" sheet. Cut 1 cm. thick long strips like picture above. Then cut the strips into about 10 - 3/4" pieces. Take each 3/4" piece and roll between your forefinger and thumb and shape into a carrot. Make around 60-75. Enough for each cupcake to get three carrots. Set the carrots aside for about an hour to harden and dry.
.jpg)
Now. . . . hmmm. . . . what should I use to top each carrot with? Yes, Parsley!! Cut a sprig small enough to top each carrot.
.jpg)
Dip the tip of each carrot top into the corn syrup
(yes, one bit the dust)
(yes, one bit the dust)
.jpg)
quickly attach to a sprig of Parsley.
.jpg)
Place all the carrots on parchment paper and set aside. . . . aren't they adorable?

Take the package of coconut and pour it into a mixing bowl, add a tsp. of green gel food coloring and with the paddle attachment, mix on low until the coconut is completely green. I tried at first mixing it it with a spoon but I was having trouble trying to make the coconut a uniform color so using the mixer ended up being a good idea. It didn't ruin the shape of the coconut shreds at all. Set aside.
.jpg)
Roll out the other half of fondant about 1/8" thick. For the Bunny "bottom", cut out 1" or 2" circles, one for each cupcake, flatten the top edge of each "bottom". For the feet, I rolled up a small ball, flattened it into an oval shape, make two for each cupcake. Lastly, for the tail, pinch off a small piece of fondant, roll into a small ball. With a small brush, stroke a smidgen of corn syrup to attach the feet and the tails to the "bottoms" like picture above. Set aside to dry for about an hour.
.jpg)
Mix the pink shimmer powder food paint with a drop of Almond extract, use more if needed.
With a small paint brush, paint on the heels and toes on each foot. I used this same method with my Bunny Cookies from last year.
I also added some blue paint to make it look like the bunny was wearing a blue jacket. . . .
Set the Bunny bottoms and feet aside, give them time to dry (about 1/2 hour).
.jpg)
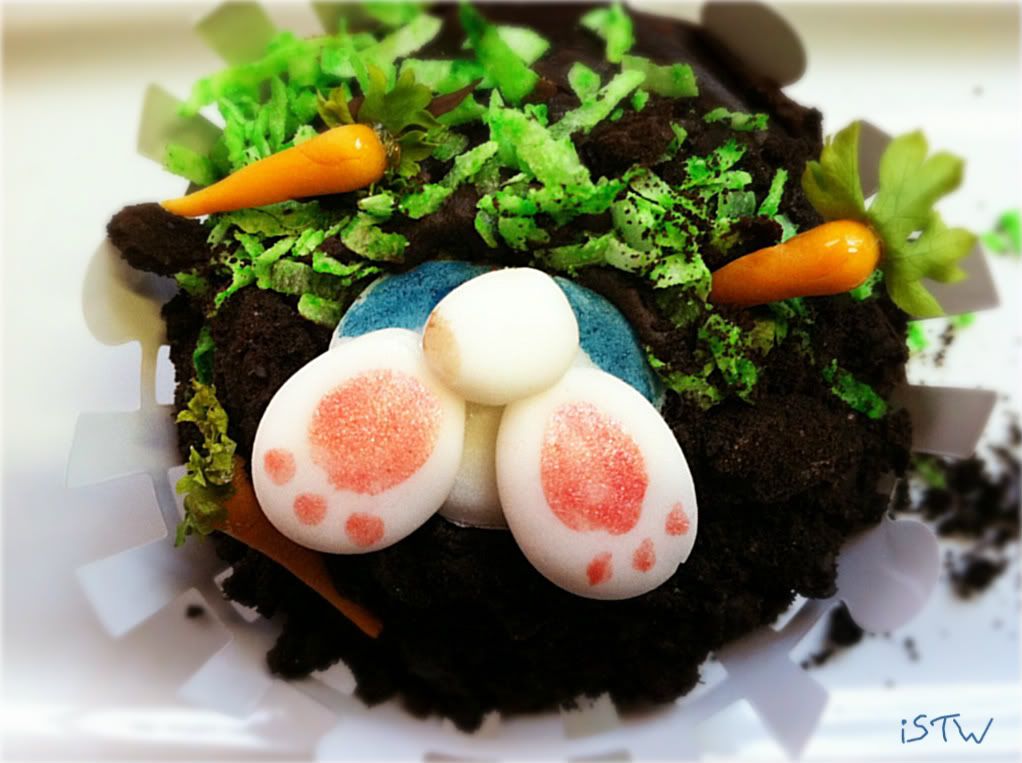
Frost each cupcake with the dark chocolate frosting then take each cupcake and dip one side into green shredded coconut.
.jpg)
Now dip the other side into the Oreo cookie crumbs.
.jpg)
So one side looks grassy and the other side looks like the dirt has been
dug up. . . . hmmmmmm, I wonder who could have dug up the dirt?
I got this idea to use the Oreo cookies from a cake some friends who were visiting from out of town (the Ennis Family) brought me. They brought it in a clay pot too and it looked so real I couldn't believe it was a cake. They even put gummy worms in it too. So cute, can't remember what they called it,...possibly "Dirt Cake"?
I got this idea to use the Oreo cookies from a cake some friends who were visiting from out of town (the Ennis Family) brought me. They brought it in a clay pot too and it looked so real I couldn't believe it was a cake. They even put gummy worms in it too. So cute, can't remember what they called it,...possibly "Dirt Cake"?
.jpg)
Take each Bunny bottom (the pink paint should be dry by now) and turn it around. Add a smidgen of chocolate frosting to the back side
.jpg)
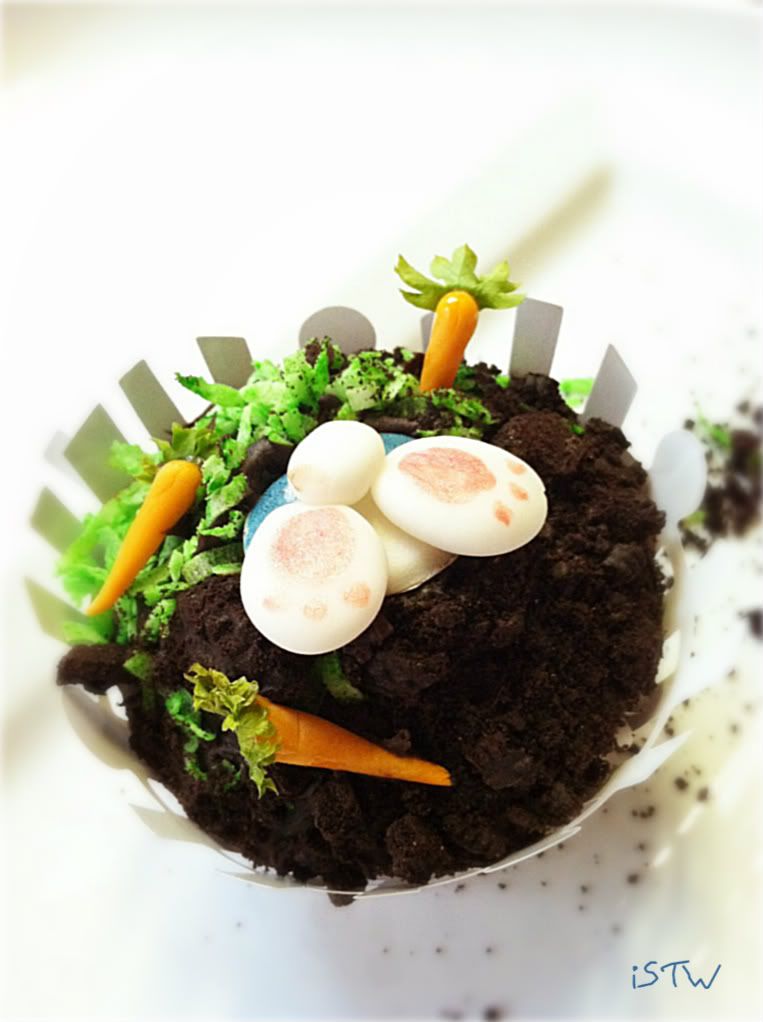
Then place right side up and gently press it into the top of the cupcake with the feet over the "dirt" like picture above
.jpg)
Start adding the carrots, any which way you want. If you poke them into the cupcake, make a hole for it first so that you don't break the carrot. I used the tip of a metal skewer, worked perfectly. Don't the carrots look real??
.jpg)
Now wrap each cupcake with the Wilson cupcake wraps. Doesn't the "dirt" look like real potting soil?
.jpg)
These cupcakes came out really cute I decided to place them with some of my Peter Rabbit vignette I had used on the mantel.
.jpg)
Too many bad bunnies to keep up with. They're digging up all the carrots in the garden!!
.jpg)
Looks like Mr. MacGregor is after one already!! Run Peter, run!!

Use the left over "grass" and "dirt" for decoration around a platter where the cupcakes will be placed.
.jpg)
.jpg)
The End. . . .
No pun intended
These cupcakes took me probably a total of eight hours to make. From baking the cupcakes from scratch to placing the last fence around the cupcake. Whew! so I advise you take two days to make these. As much fun as I had making them, I was pooped by evening time yet very satisfied and content.
I pray you have a blessed Easter and may the reason of new life, new growth, new beginnings remind you about the new life Christ gives.
Therefore if any man be in Christ, he is a new creature: old things are passed away; behold all things are become new. -2 Corinthians 5:17
R.I.P Thomas Kinkade, "Painter of Light"


Love these! Soooo cute!
ReplyDeleteWow!
ReplyDeleteYou are so creative, and so talented!
And... dedicated.
Your bunny cupcakes are seriously the cutest cupcakes I've ever seen!!
I imagine that your family thinks so too :)
Hope you had a wonderful Easter Sunday.
Hope you enjoyed those cupcakes too...especially after all the effort that you put into them :)
Happy Monday !
Oh my goodness, these are the cutest cupcakes ever!! You did a fabulous job. They're almost too pretty to eat, but I'd sure love to have one. I'm your newest follower. Follow me back?? :)
ReplyDeleteYou are so talented! These turned out adorable. Thanks so much for sharing at Mix it up Monday :)
ReplyDeleteOh my goodness those are too cute!! I can see why they took so long. There are alot of steps. I'm glad you had fun making them! Thanks for linking!! Kristen
ReplyDeleteOMG, do darn cute and adorable. I don't think I've ever seen anything cuter. Wow 8 hours, girl, sure glad you had fun making them. Bet they taste even better. Thanks for sharing you creative inspiration at Sunday's Best.
ReplyDeleteThese are sooooo adorable - a lot of work, but absolutely work it!
ReplyDeleteWonderful to have you at Seasonal Sundays this Easter.
- The Tablescaper
Wow~~These are just the cutest cupcakes that I've ever seen. I can't imagine spending 8 hours on making them but they sure turned out cute!! The dirt and carrots look so real. Honestly...you did a fantastic job on these.
ReplyDelete